【沙盘地图】多模态视觉理解+SLAM导航
1.课程内容
1.学习在沙盘地图上使用机器人的视觉理解与SLAM导航结合的功能
2.准备工作
2.1 内容说明
本节课程以Orin主板为例。云台舵机USB相机版本用户为例。树莓派和Jetson-nano主板,需要在宿主机中打开终端,然后输入进入docker容器的指令,进入到docker容器后的终端里边输入本节课程提及的指令,宿主机进入docker容器的教程可以参考本产品教程【机器人配置与操作指引】中的【5、进入小车Docker(Jetson-Nano和树莓派5用户看这里)】的内容。orin和rdk主板直接打开终端,输入本节课程提及的指令即可。
⚠️ 同样的测试指令,大模型回复的内容不会完全相同,和教程中截图会略有差异,如果需要增强或减弱大模型回复的多样性,参考【【AI大模型开发】-【部署RAG知识库】课程中配置决策层大模型参数部分。
2.2 配置地图映射文件
地图映射的原理和概念详见【AI大模型基础知识】-【3. 具身智能机器人系统架构】章节课程内容
运行此案例前,需要根据【激光雷达课程】-【5.6.7其一建图算法】建图并且保存地图,得到.yaml地图文件
树莓派PI5、jetson nano主控,需要先进入docker容器,RDK X5,Orin主板无须进入,
VNC连接机器人桌面,打开终端输入命令,
ros2 launch yahboomcar_nav laser_bringup_launch.py
虚拟机端新建一个终端启动,(RDK X5、树莓派、jetsonnano建议可视化在虚拟机端运行)
xxxxxxxxxxros2 launch yahboomcar_nav display_nav_launch.py
等待导航算法开启即可出图,再打开终端输入
x
#导航算法二选一#普通导航ros2 launch yahboomcar_nav navigation_teb_launch.py
#快速重定位导航 (RDKX5、树莓派5、jetsonnano主控不支持)ros2 launch yahboomcar_nav localization_imu_odom.launch.py use_rviz:=false load_state_filename:=/home/jetson/yahboomcar_ros2_ws/yahboomcar_ws/src/yahboomcar_nav/maps/yahboomcar.pbstream
ros2 launch yahboomcar_nav navigation_cartodwb_launch.py maps:=/home/jetson/yahboomcar_ros2_ws/yahboomcar_ws/src/yahboomcar_nav/maps/yahboomcar.yaml params_file:=/home/jetson/yahboomcar_ros2_ws/yahboomcar_ws/src/yahboomcar_nav/params/cartoteb_nav_params.yaml注:【快速重定位导航】此处yahboomcar.yaml必须和yahboomcar.pbstream是同时完成建图的,即是同一个地图,参考cartograph建图算法保存地图
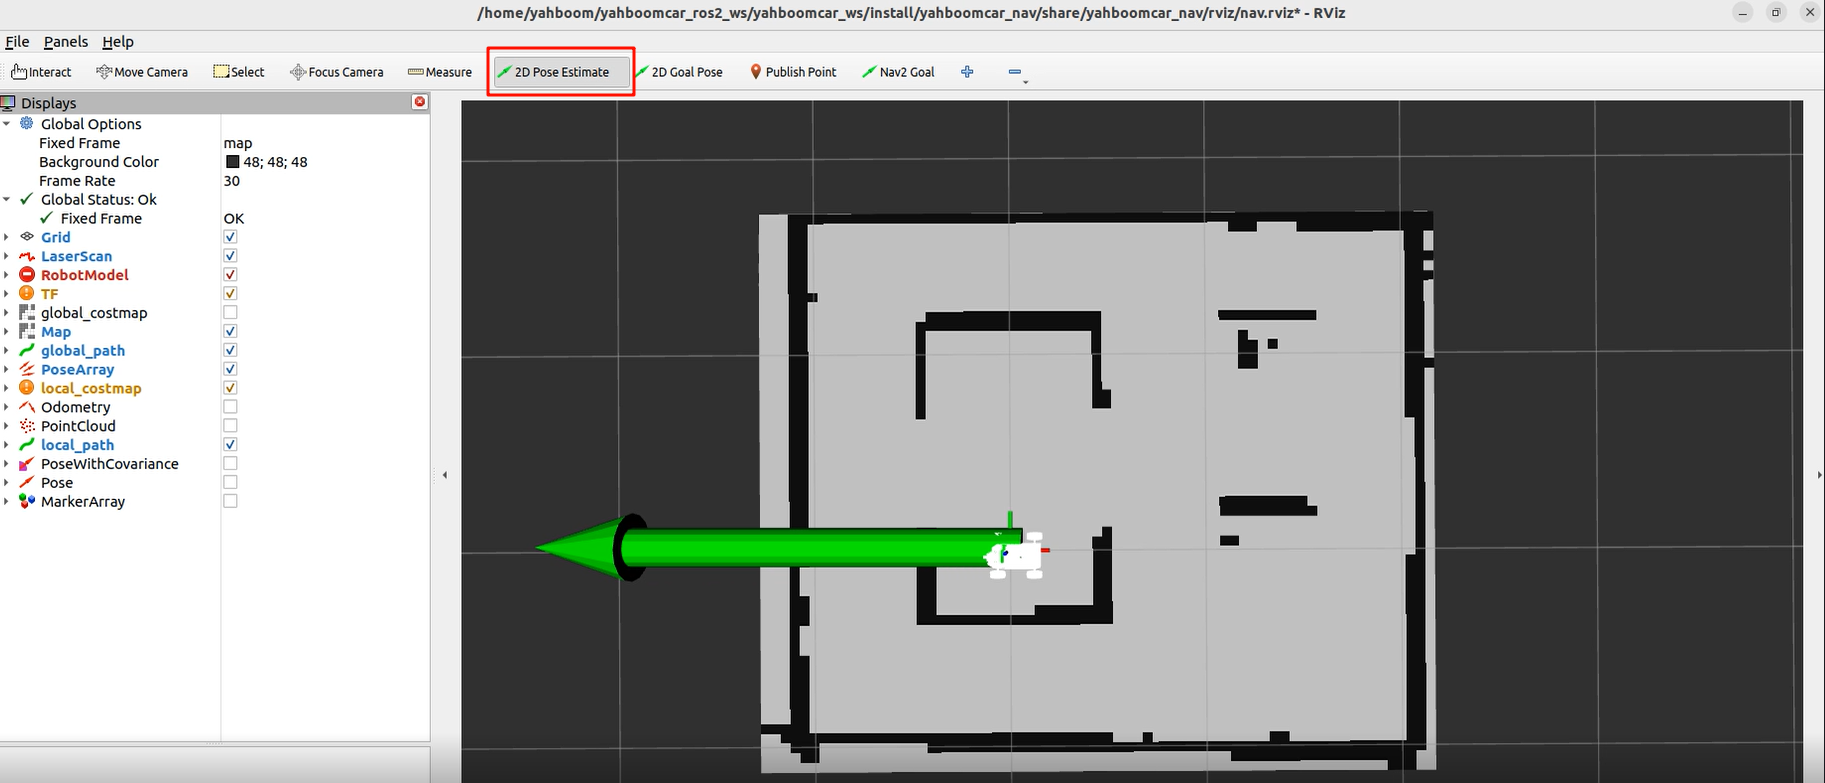
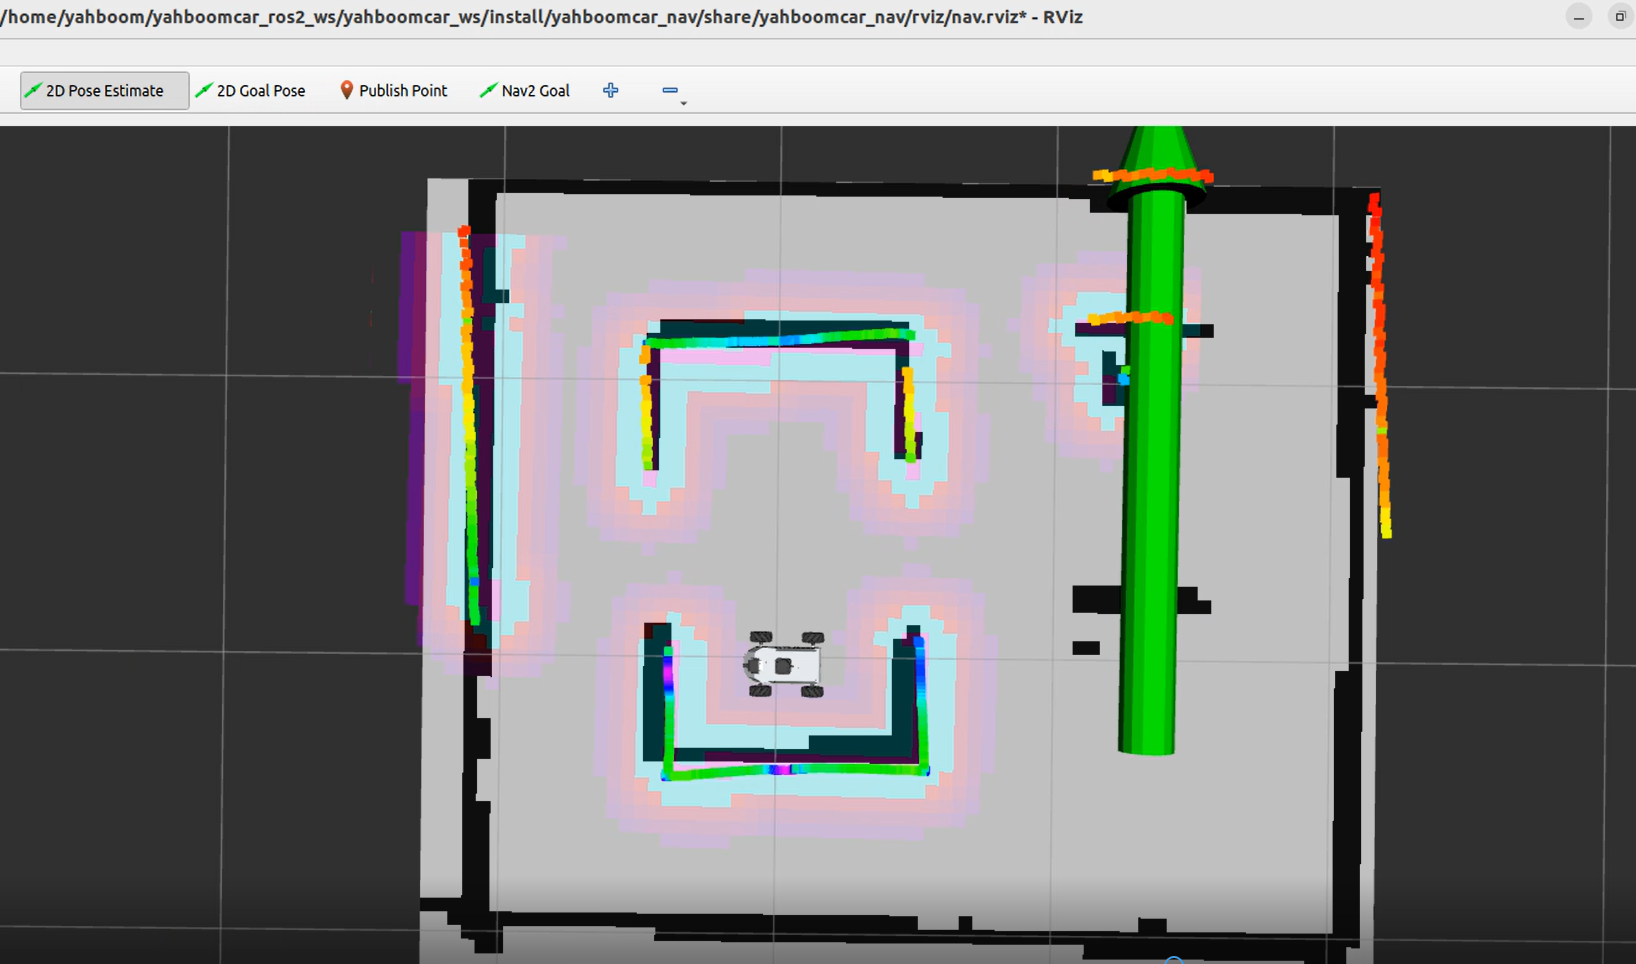
之后会在rviz2的出现地图可视化界面,点击上方工具栏中的2D Pose Estimate,进入选择状态,在地图上大致标出具机器人所在的位置和朝向
机器人的模型会在地图中显示,如下图所示:
在虚拟机中再次新建一个终端,输入命令
xxxxxxxxxxros2 topic list
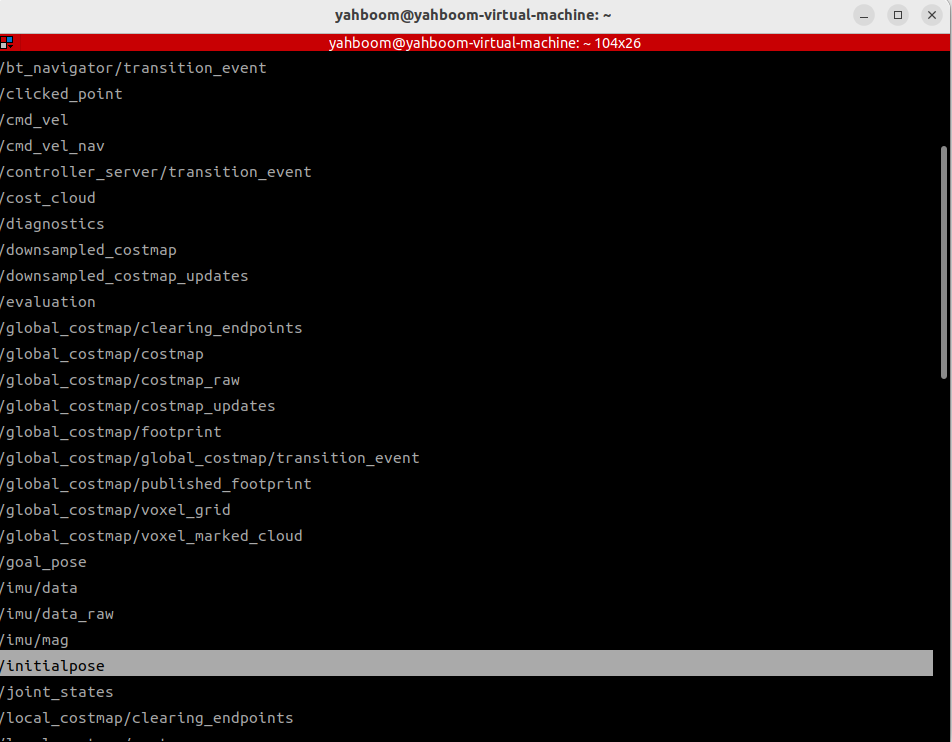
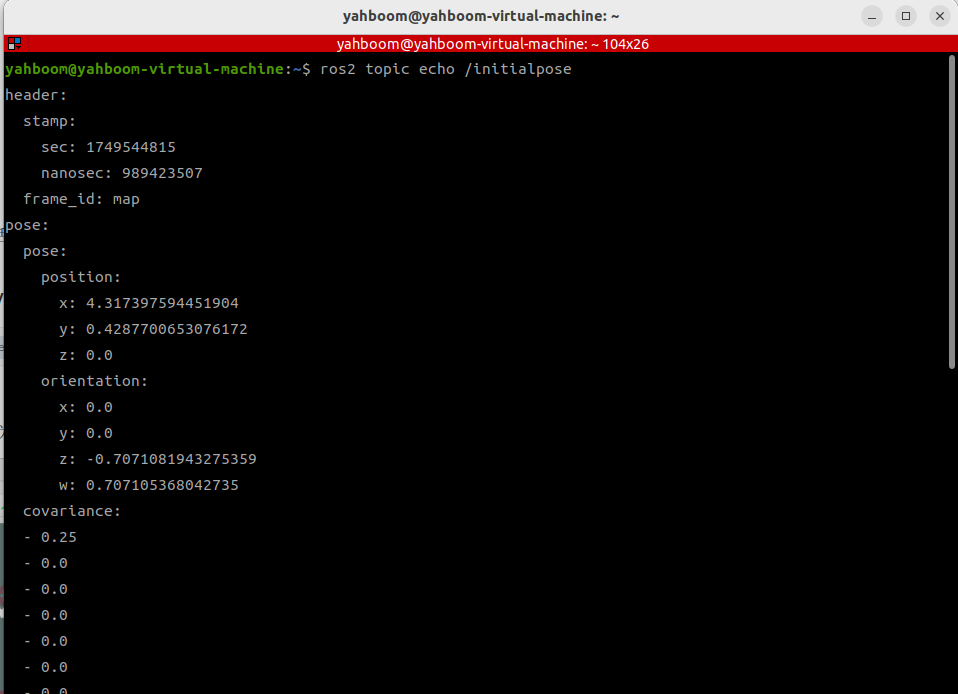
可以看到有/initialpose话题,该话题为为上一步在rviz2中使用2D Pose Estimate工具发布话题,我们可以借助该工具发布坐标查看/initialpose话题的数据获取到地图中某个点位的坐标和朝向角
在终端输入以下命令,即可观察到/initialpose话题上的数据
xxxxxxxxxxros2 topic echo /initialpose
我们可以给地图中任意一个点位命名,这里以图示命名举例
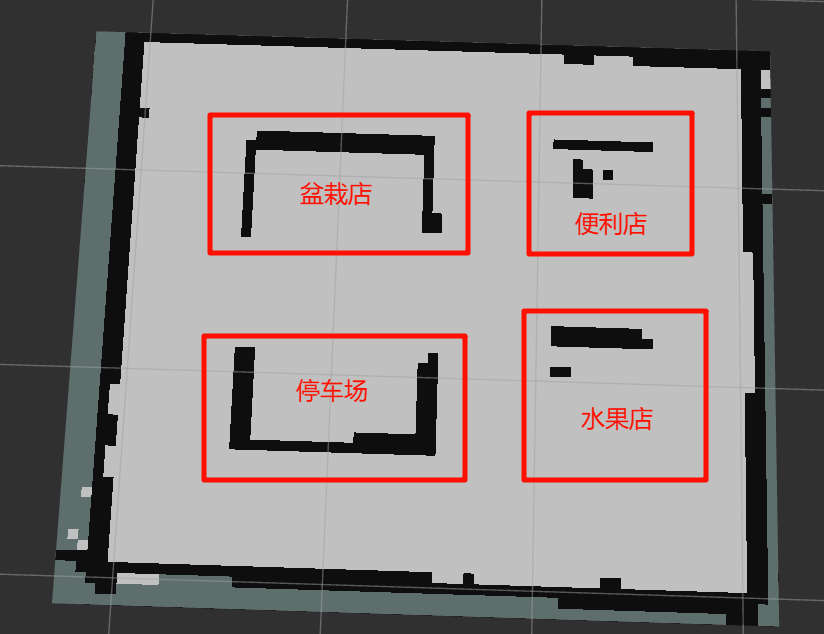
如下图所示,我们先点击2D Pose Estimate工具,然后在"水果店"区域任选一个地方鼠标左键点击不松手,可以调整朝向,确定后松手
机器人位置会调整到刚才选定的位置和朝向,在rviz中可以预览机器人预计的位置和朝向
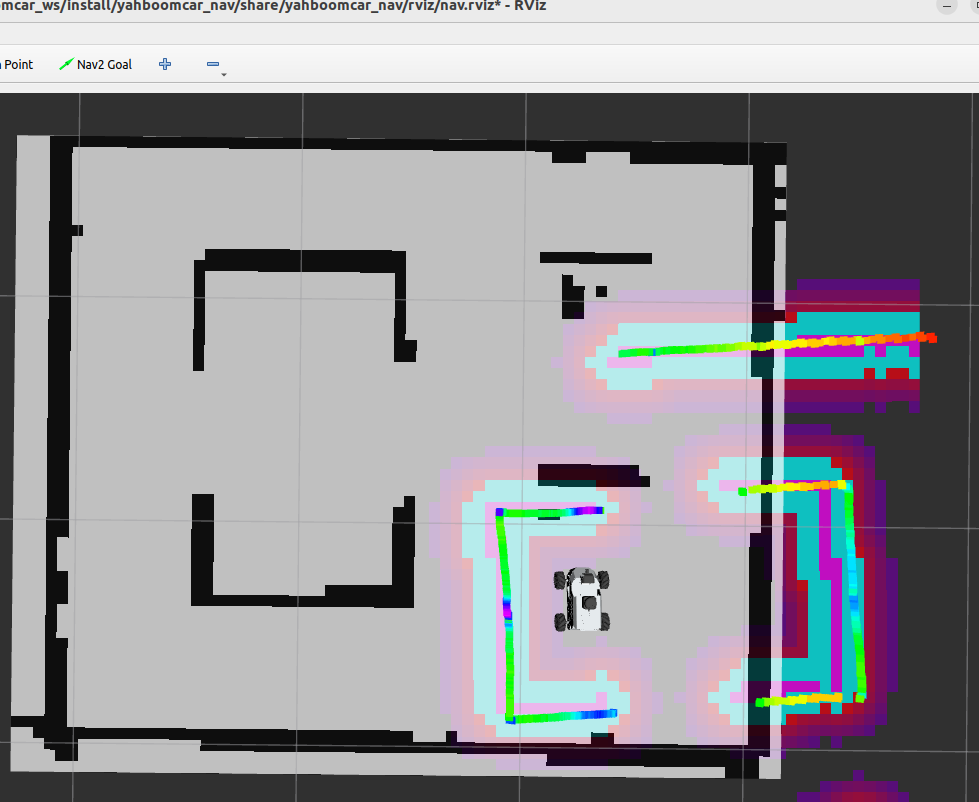
在终端窗口的最后一帧信息中可以看到刚才我们通过2D Pose Estimate工具标出的目标点的的坐标
打开map_mapping.yaml地图映射文件,文件位于:
rdkx5主机:
xxxxxxxxxx/home/sunrise/yahboomcar_ros2_ws/yahboomcar_ws/src/multi_brains/config/map_mapping.yaml
jetson orin主机:
xxxxxxxxxx/home/jetson/yahboomcar_ros2_ws/yahboomcar_ws/src/multi_brains/config/map_mapping.yamljetson nano、树莓派主机,需要先进入docker ,
xxxxxxxxxx/root/yahboomcar_ros2_ws/yahboomcar_ws/src/multi_brains/config/map_mapping.yaml将其中的A中的"name"替换成"水果店"、"position"、"orientation"数据替换成终端中/initialpose话题刚才我们看到的数据
xxxxxxxxxx#根据实际的场景环境,自定义地图中的区域,可以添加任意个区域,注意和大模型的地图映射保持一致即可#According to the actual scene environment, customize the areas in the map. You can add any number of areas, just make sure they are consistent with the map mapping of the large model
#地图映射Map mapping
common_map_areas: #常规导航 common navigation    A:       name: '水果店'      position:        x: 1.339120626449585        y: -0.4776395797729492        z: 0.0      orientation:        x: 0.0        y: 0.0        z: 0.7038725577603971        w: 0.7103262788548911
#此处可新增添加区域对应的栅格地图坐标点,注意和上面格式保持一致#Here, you can add the raster map coordinate points corresponding to the added area. Please note that the format should be consistent with the above
按照同样的方式,我们可以增加"盆栽店"的地图映射
xxxxxxxxxx#根据实际的场景环境,自定义地图中的区域,可以添加任意个区域,注意和大模型的地图映射保持一致即可#According to the actual scene environment, customize the areas in the map. You can add any number of areas, just make sure they are consistent with the map mapping of the large model#地图映射Map mapping
common_map_areas: #常规导航 common navigation A: name: '水果店' position: x: 1.339120626449585 y: -0.4776395797729492 z: 0.0 orientation: x: 0.0 y: 0.0 z: 0.7038725577603971 w: 0.7103262788548911 B: name: '盆栽店' position: x: -0.0008649379014968872 y: 0.4937915802001953 z: 0.0 orientation: x: 0.0 y: 0.0 z: 0.7133229968132297 w: 0.7008354316224266•#此处可新增添加区域对应的栅格地图坐标点,注意和上面格式保持一致#Here, you can add the raster map coordinate points corresponding to the added area. Please note that the format should be consistent with the above然后在终端切换到/yahboomcar_ros2_ws/yahboomcar_ws#/工作空间下:重新编译 multi_brains 功能包生效配置(jetson nano、树莓派主机,需要先进入docker)
xxxxxxxxxxcd ~/yahboomcar_ros2_ws/yahboomcar_ws/
重新编译功能包:
xxxxxxxxxxcolcon build --packages-select multi_brains

3.运行案例
3.1 启动程序
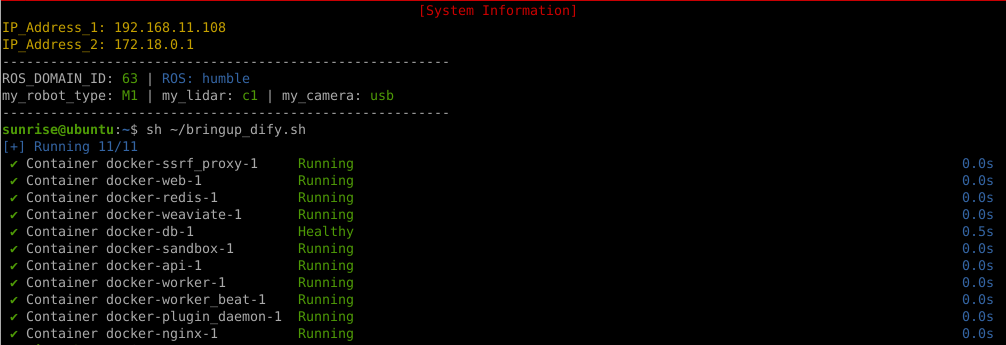
打开宿主机终端,开启dify环境
xxxxxxxxxxsh ~/bringup_dify.sh
树莓派PI5、jetson nano主控,需要先进入docker容器;RDK X5,Orin主板无须进入,
打开终端输入命令:
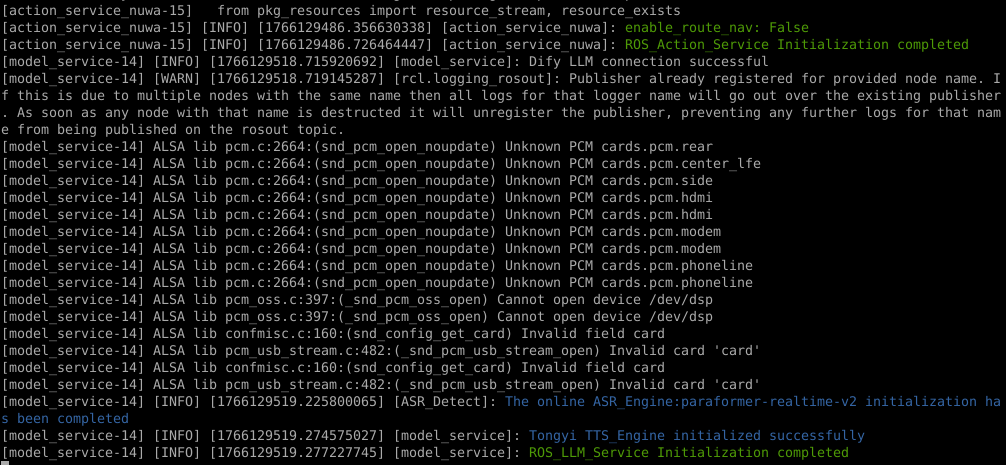
xxxxxxxxxxros2 launch multi_brains llm_agent_control.launch.py
初始化完成后会显示如下内容,
虚拟端新建一个终端启动,(RDKX5、树莓派、jetsonnano建议可视化在虚拟机端运行)
xxxxxxxxxxros2 launch yahboomcar_nav display_nav_launch.py
等待导航算法开启即可出图,再打开终端输入
x
#导航算法二选一#普通导航ros2 launch yahboomcar_nav navigation_teb_launch.py
#快速重定位导航 (RDKX5、树莓派5、jetsonnano主控不支持)ros2 launch yahboomcar_nav localization_imu_odom.launch.py use_rviz:=false load_state_filename:=/home/jetson/yahboomcar_ros2_ws/yahboomcar_ws/src/yahboomcar_nav/maps/yahboomcar.pbstream
ros2 launch yahboomcar_nav navigation_cartodwb_launch.py maps:=/home/jetson/yahboomcar_ros2_ws/yahboomcar_ws/src/yahboomcar_nav/maps/yahboomcar.yaml params_file:=/home/jetson/yahboomcar_ros2_ws/yahboomcar_ws/src/yahboomcar_nav/params/cartoteb_nav_params.yaml注:【快速重定位导航】此处yahboomcar.yaml必须和yahboomcar.pbstream是同时完成建图的,即是同一个地图,参考cartograph建图算法保存地图
之后按照启动导航功能的流程进行初始化定位,会打开rviz2的可视化界面,点击上方工具栏中的2D Pose Estimate,进入选择状态,在地图上大致标出具机器人所在的位置和朝向,初始化定位之后,准备工作完成


3.2 测试案例
这里给出参考的测试案例,用户可自行编撰自己的对话指令
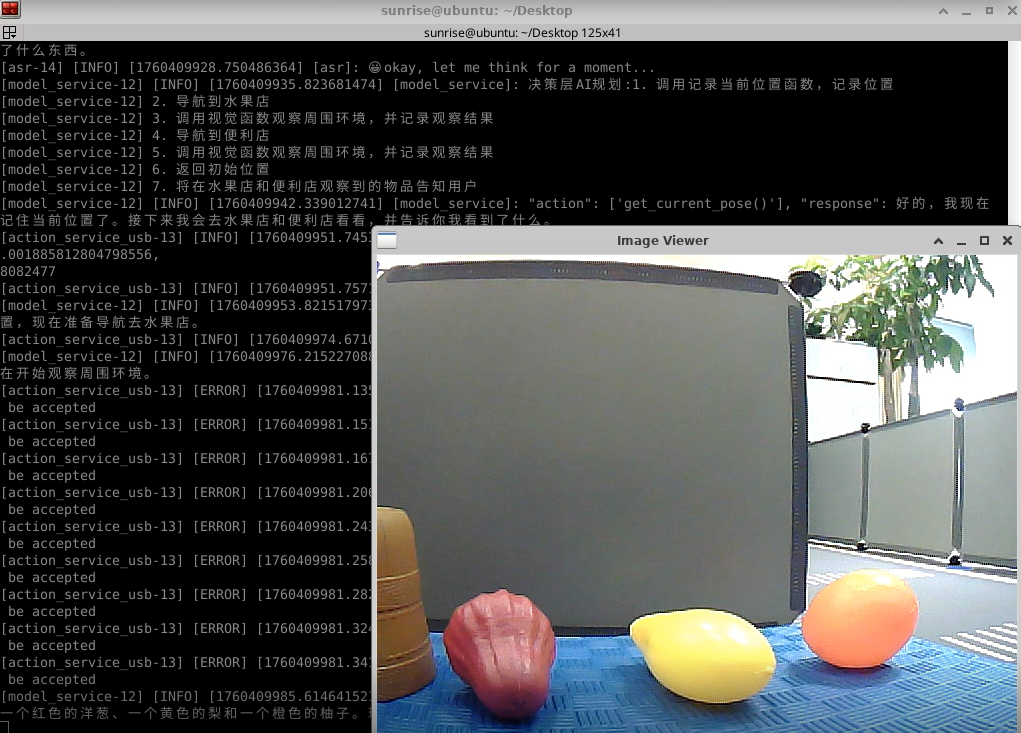
请你先记住现在的位置,然后依次去水果店和便利店,返回到原来的位置,告诉我你都看到了什么东西。
3.2.1 案例1
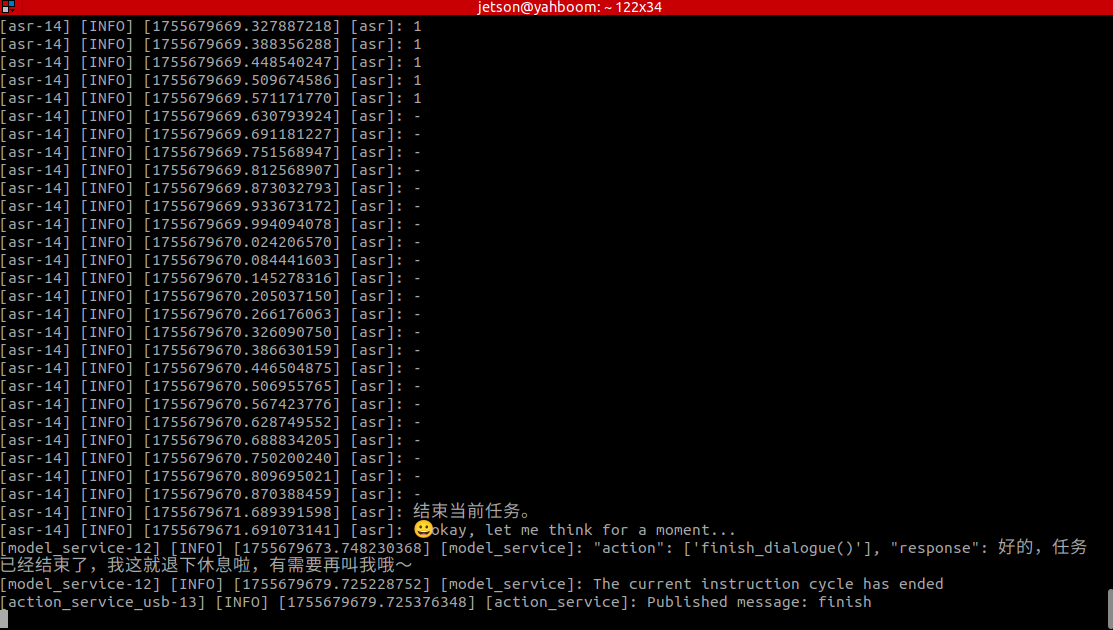
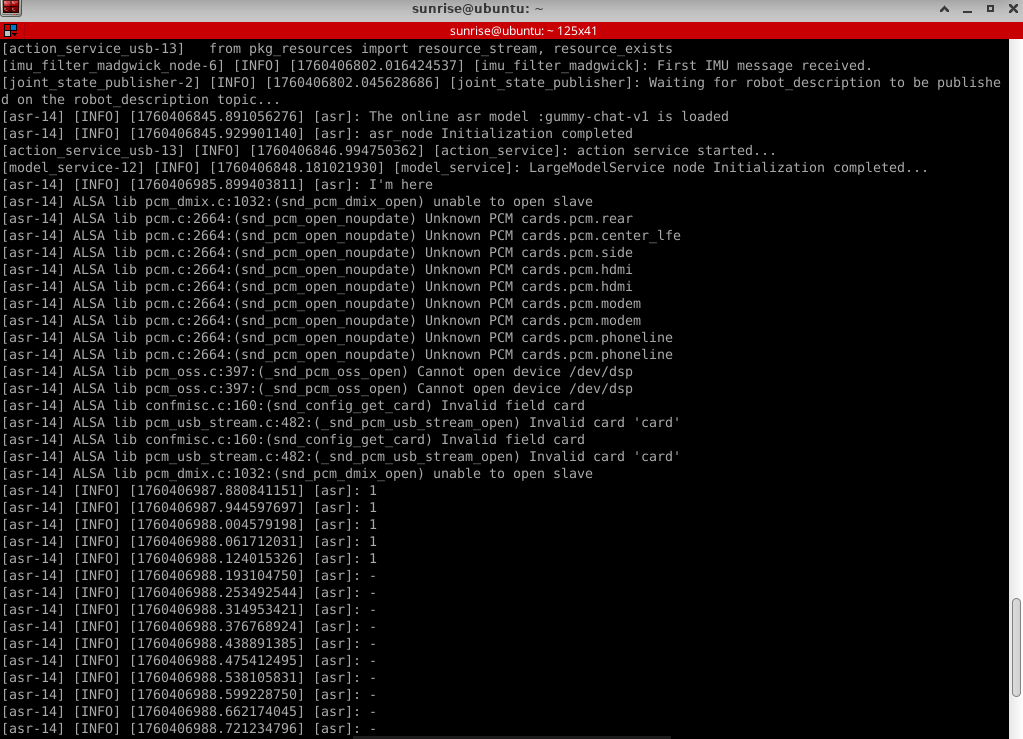
首先使用"你好小亚"唤醒机器人,机器人回应:"我在,请吩咐",机器人应答后蜂鸣器短暂(beep—)响后,用户可以进行讲话,机器人会进行动态声音检测,如果有声音活动则打印1,无声音活动会打印-,当说话结束后会进行尾音检测,静音超过450ms则停止录音。
动态声音检测(VAD)如下图所示:
机器人会先与用户进行对方回复用户,然后按照指令动作,同时终端打印信息如下:
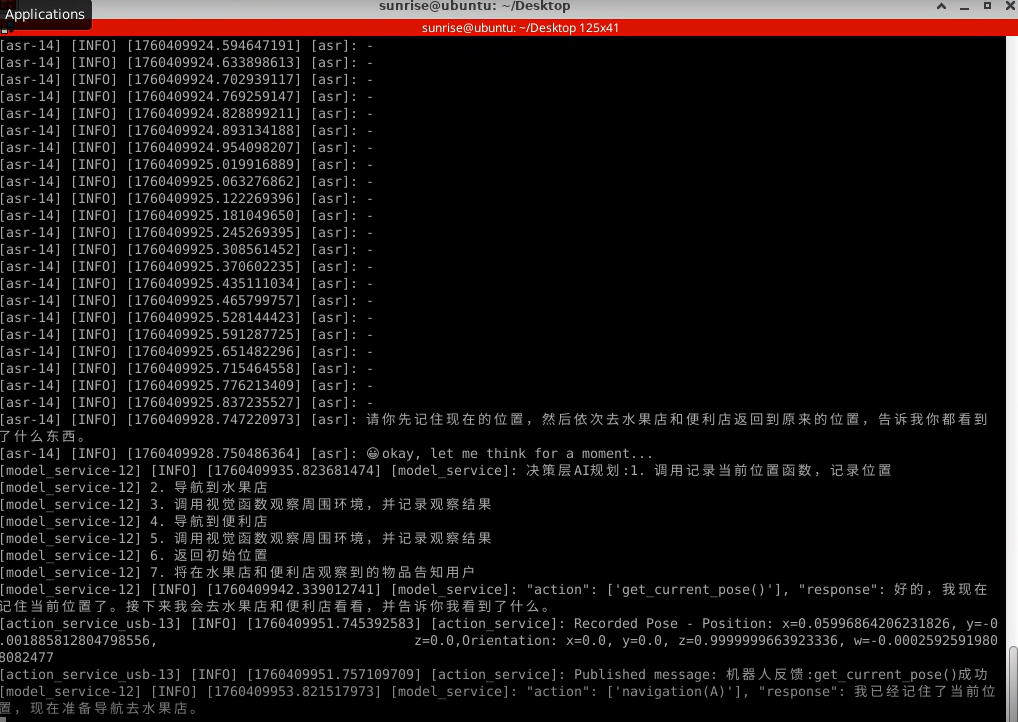
决策层大模型输出规划出的任务步骤:

之后执行层大模型会按照该任务步骤执行:
当该任务完成,语音"你好小亚"唤醒机器人,机器人回应:"我在,请吩咐",此时可以进行下一个指令
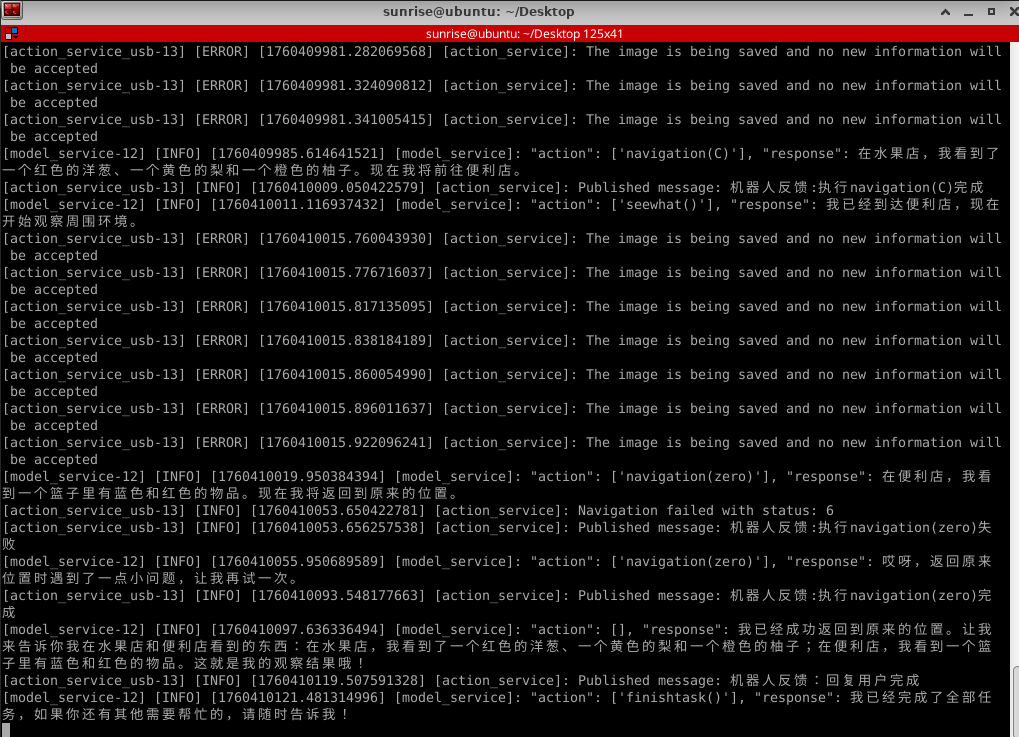
机器人完成任务后会进入等待状态,此时机器人又再次进入自由对话状态,但所有的对话历史会被一直保留。此时可以再此唤醒小亚,“结束当前任务”,让机器人结束当前的任务周期,清理掉对话历史,开启新的任务周期。