人体检测
例程实验效果
本节我们来学习一下使用K230实现人体检测的功能。
例程代码在【 源码汇总 / 08.Body / 01.person_detection.py】
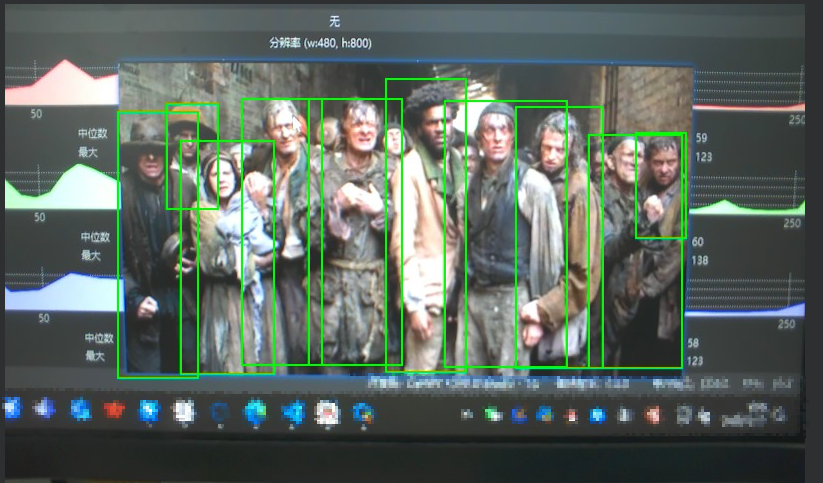
连接IDE后运行本节例程代码,用K230对准一张有多个人体存在的画面,可以看到屏幕中标记出了所有人体的位置
对于多个人体重叠的场景,也能较为精准的识别出来
已添加串口输出功能
检测到人体后会发送如下格式的串口输出
$x,y,w,h#
其中'$'代表数据的开头, '#'代表数据的结尾
x,y,w,h是人体检测框的位置(分辨率为640*480)
代码讲解
代码结构
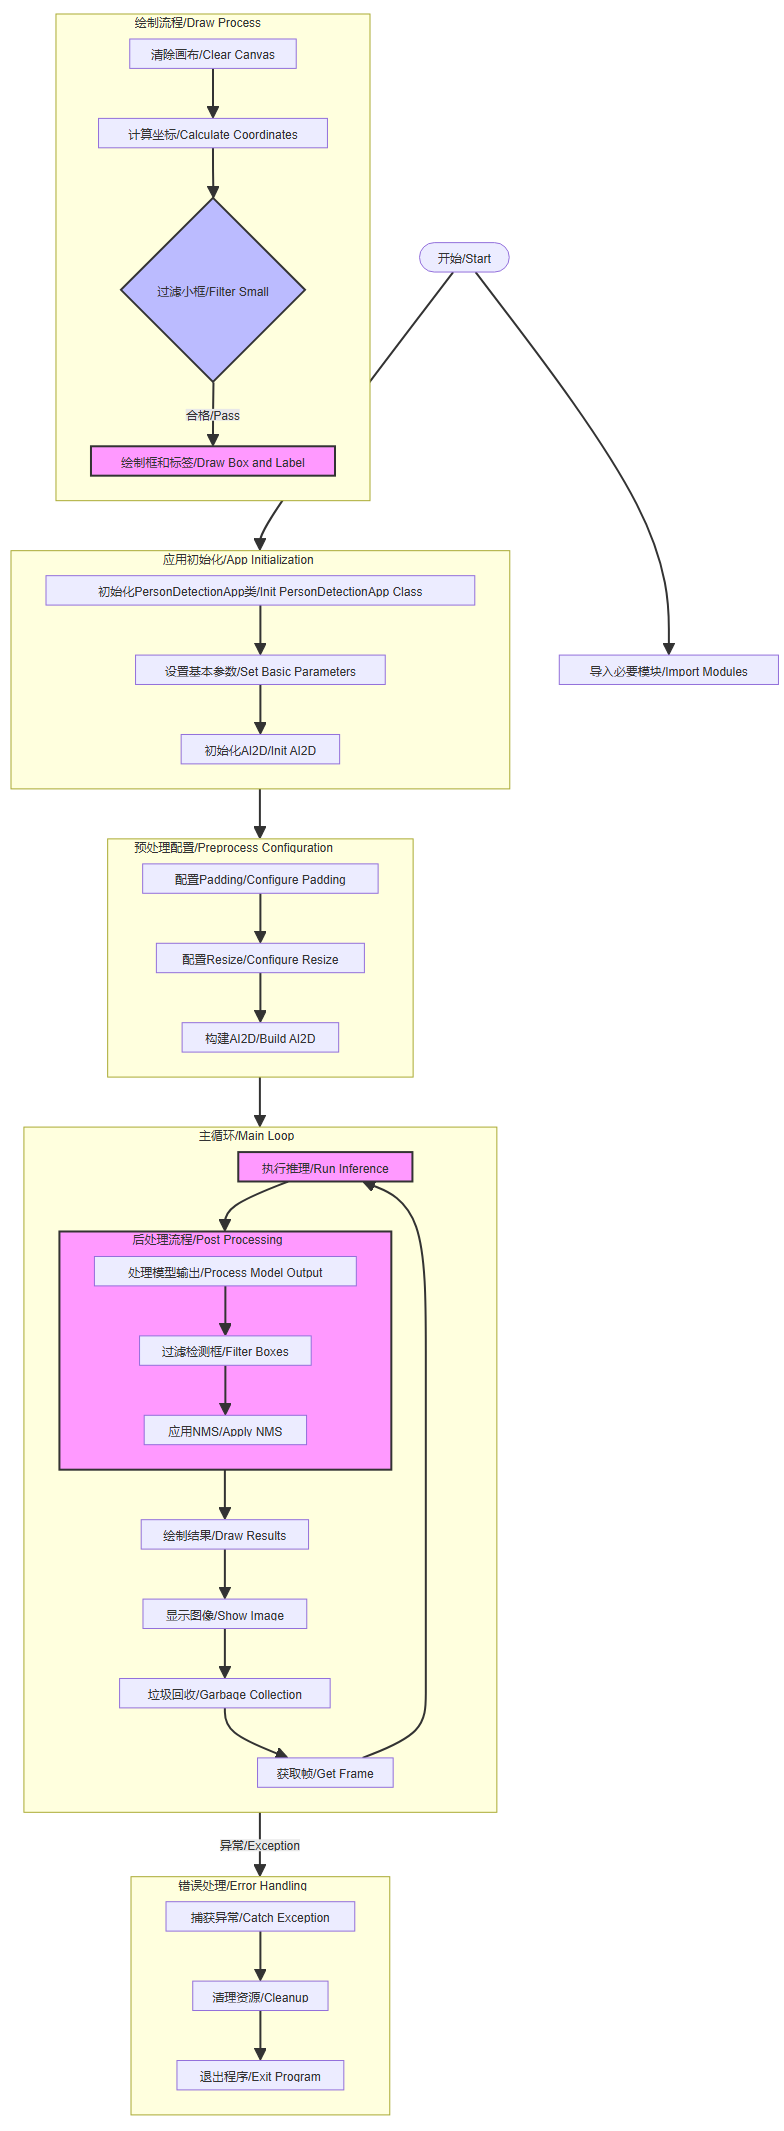
主程序流程:
- 初始化PipeLine
- 创建PipeLine实例
- 执行Demo函数
Demo执行流程:
- 初始化参数(模型路径、阈值等)
- 初始化人体检测类
- 进入主循环处理图像
人体检测类功能:
- 类初始化(设置参数和AI2D)
- 预处理流程(padding和resize)
- 后处理流程(处理检测结果)
- 结果绘制(绘制检测框和标签)
异常处理:
- 捕获异常并打印信息
- 执行反初始化清理
代码片段
完整代码请参考【源码汇总】
xfrom libs.PipeLine import PipeLine, ScopedTimingfrom libs.AIBase import AIBasefrom libs.AI2D import Ai2dimport osimport ujsonfrom media.media import *from time import *import nncase_runtime as nnimport ulab.numpy as npimport timeimport utimeimport imageimport randomimport gcimport sysimport aicubeperson_det = None# 自定义人体检测类# (Custom person detection class)class PersonDetectionApp(AIBase): def __init__(self, kmodel_path, model_input_size, labels, anchors, confidence_threshold=0.2, nms_threshold=0.5, nms_option=False, strides=[8, 16, 32], rgb888p_size=[224, 224], display_size=[640, 360], debug_mode=0): """ 初始化人体检测应用类 (Initialize the person detection application class) 参数: kmodel_path: 模型文件路径 (kmodel_path: Path to the model file) model_input_size: 模型输入分辨率 (model_input_size: Model input resolution) labels: 标签列表 (labels: List of labels) anchors: 检测anchors设置 (anchors: Detection anchor settings) confidence_threshold: 置信度阈值 (confidence_threshold: Confidence threshold) nms_threshold: nms阈值 (nms_threshold: NMS threshold) nms_option: nms是否开启 (nms_option: Whether NMS is enabled) strides: 特征图降采样倍数 (strides: Feature map downsampling factor) rgb888p_size: 传感器输入图像分辨率 (rgb888p_size: Sensor input image resolution) display_size: 显示分辨率 (display_size: Display resolution) debug_mode: 调试模式级别 (debug_mode: Debug mode level) """ super().__init__(kmodel_path, model_input_size, rgb888p_size, debug_mode) self.kmodel_path = kmodel_path # 模型输入分辨率 # (Model input resolution) self.model_input_size = model_input_size # 标签 # (Labels) self.labels = labels # 检测anchors设置 # (Detection anchor settings) self.anchors = anchors # 特征图降采样倍数 # (Feature map downsampling factor) self.strides = strides # 置信度阈值设置 # (Confidence threshold setting) self.confidence_threshold = confidence_threshold # nms阈值设置 # (NMS threshold setting) self.nms_threshold = nms_threshold self.nms_option = nms_option # sensor给到AI的图像分辨率 # (Image resolution from sensor to AI) self.rgb888p_size = [ALIGN_UP(rgb888p_size[0], 16), rgb888p_size[1]] # 显示分辨率 # (Display resolution) self.display_size = [ALIGN_UP(display_size[0], 16), display_size[1]] self.debug_mode = debug_mode # Ai2d实例,用于实现模型预处理 # (Ai2d instance for model preprocessing) self.ai2d = Ai2d(debug_mode) # 设置Ai2d的输入输出格式和类型 # (Set Ai2d input and output formats and types) self.ai2d.set_ai2d_dtype(nn.ai2d_format.NCHW_FMT, nn.ai2d_format.NCHW_FMT, np.uint8, np.uint8) # 配置预处理操作,这里使用了pad和resize,Ai2d支持crop/shift/pad/resize/affine,具体代码请打开/sdcard/app/libs/AI2D.py查看 # (Configure preprocessing operations, using pad and resize here, Ai2d supports crop/shift/pad/resize/affine) def config_preprocess(self, input_image_size=None): """ 配置模型输入数据的预处理操作 (Configure preprocessing operations for model input data) 参数: input_image_size: 输入图像尺寸,如果为None则使用默认rgb888p_size (input_image_size: Input image size, if None uses default rgb888p_size) """ with ScopedTiming("set preprocess config", self.debug_mode > 0): # 初始化ai2d预处理配置,默认为sensor给到AI的尺寸,您可以通过设置input_image_size自行修改输入尺寸 # (Initialize ai2d preprocessing configuration, default is the size from sensor to AI) ai2d_input_size = input_image_size if input_image_size else self.rgb888p_size top, bottom, left, right = self.get_padding_param() self.ai2d.pad([0, 0, 0, 0, top, bottom, left, right], 0, [0, 0, 0]) self.ai2d.resize(nn.interp_method.tf_bilinear, nn.interp_mode.half_pixel) self.ai2d.build([1, 3, ai2d_input_size[1], ai2d_input_size[0]], [1, 3, self.model_input_size[1], self.model_input_size[0]]) # 自定义当前任务的后处理 # (Custom post-processing for the current task) def postprocess(self, results): """ 对模型输出进行后处理 (Post-process the model output) 参数: results: 模型的原始输出 (results: Raw output from the model) 返回: 处理后的检测结果 (Processed detection results) """ with ScopedTiming("postprocess", self.debug_mode > 0): # 这里使用了aicube模型的后处理接口anchorbasedet_post_preocess # (Use the anchorbasedet_post_process interface from the aicube model for post-processing) dets = aicube.anchorbasedet_post_process(results[0], results[1], results[2], self.model_input_size, self.rgb888p_size, self.strides, len(self.labels), self.confidence_threshold, self.nms_threshold, self.anchors, self.nms_option) return dets # 绘制结果 # (Draw results) def draw_result(self, pl, dets): """ 在画布上绘制人体检测结果 (Draw person detection results on the canvas) 参数: pl: 画布对象 (pl: Canvas object) dets: 检测结果 (dets: Detection results) """ with ScopedTiming("display_draw", self.debug_mode > 0): if dets: pl.osd_img.clear() for det_box in dets: # 计算检测框在显示分辨率下的坐标和尺寸 # (Calculate the coordinates and size of the detection box in the display resolution) x1, y1, x2, y2 = det_box[2], det_box[3], det_box[4], det_box[5] w = float(x2 - x1) * self.display_size[0] // self.rgb888p_size[0] h = float(y2 - y1) * self.display_size[1] // self.rgb888p_size[1] x1 = int(x1 * self.display_size[0] // self.rgb888p_size[0]) y1 = int(y1 * self.display_size[1] // self.rgb888p_size[1]) x2 = int(x2 * self.display_size[0] // self.rgb888p_size[0]) y2 = int(y2 * self.display_size[1] // self.rgb888p_size[1]) # 过滤掉尺寸太小的检测框 # (Filter out detection boxes that are too small) if (h < (0.1 * self.display_size[0])): continue if (w < (0.25 * self.display_size[0]) and ((x1 < (0.03 * self.display_size[0])) or (x2 > (0.97 * self.display_size[0])))): continue if (w < (0.15 * self.display_size[0]) and ((x1 < (0.01 * self.display_size[0])) or (x2 > (0.99 * self.display_size[0])))): continue # 在画布上绘制检测框和标签 # (Draw the detection box and label on the canvas) pl.osd_img.draw_rectangle(x1, y1, int(w), int(h), color=(255, 0, 255, 0), thickness=2) pl.osd_img.draw_string_advanced(x1, y1 - 50, 32, " " + self.labels[det_box[0]] + " " + str(round(det_box[1], 2)), color=(255, 0, 255, 0)) else: pl.osd_img.clear() # 计算padding参数 # (Calculate padding parameters) def get_padding_param(self): """ 计算将输入图像等比缩放到模型输入尺寸时需要的padding参数 (Calculate the padding parameters required to proportionally scale the input image to the model input size) 返回: padding参数 [top, bottom, left, right] (Padding parameters [top, bottom, left, right]) """ dst_w = self.model_input_size[0] dst_h = self.model_input_size[1] input_width = self.rgb888p_size[0] input_high = self.rgb888p_size[1] ratio_w = dst_w / input_width ratio_h = dst_h / input_high if ratio_w < ratio_h: ratio = ratio_w else: ratio = ratio_h new_w = (int)(ratio * input_width) new_h = (int)(ratio * input_high) dw = (dst_w - new_w) / 2 dh = (dst_h - new_h) / 2 top = int(round(dh - 0.1)) bottom = int(round(dh + 0.1)) left = int(round(dw - 0.1)) right = int(round(dw - 0.1)) return top, bottom, left, rightdef exce_demo(pl): """ 执行人体检测演示 (Execute person detection demo) 参数: pl: PipeLine对象 (pl: PipeLine object) """ global person_det display_mode = pl.display_mode rgb888p_size = pl.rgb888p_size display_size = pl.display_size # 设置模型路径和其他参数 # (Set model path and other parameters) kmodel_path = "/sdcard/kmodel/person_detect_yolov5n.kmodel" # 其它参数设置 # (Other parameter settings) confidence_threshold = 0.2 nms_threshold = 0.6 labels = ["person"] anchors = [10, 13, 16, 30, 33, 23, 30, 61, 62, 45, 59, 119, 116, 90, 156, 198, 373, 326] try: # 初始化自定义人体检测实例 # (Initialize the custom person detection instance) person_det = PersonDetectionApp(kmodel_path, model_input_size=[640, 640], labels=labels, anchors=anchors, confidence_threshold=confidence_threshold, nms_threshold=nms_threshold, nms_option=False, strides=[8, 16, 32], rgb888p_size=rgb888p_size, display_size=display_size, debug_mode=0) person_det.config_preprocess() while True: with ScopedTiming("total", 1): # 获取当前帧数据 # (Get the current frame data) img = pl.get_frame() # 推理当前帧 # (Inference on the current frame) res = person_det.run(img) # 绘制结果到PipeLine的osd图像 # (Draw the results on the PipeLine's osd image) person_det.draw_result(pl, res) # 显示当前的绘制结果 # (Display the current drawing results) pl.show_image() gc.collect() except Exception as e: print("人体检测功能退出") # (Person detection function exited) finally: person_det.deinit() # 反初始化 # (Deinitialize)def exit_demo(): """ 退出人体检测演示 (Exit person detection demo) """ global person_det person_det.deinit()if __name__ == "__main__": rgb888p_size = [640, 360] display_size = [640, 480] display_mode = "lcd" # 初始化PipeLine,用于图像处理流程 # (Initialize PipeLine for image processing) pl = PipeLine(rgb888p_size=rgb888p_size, display_size=display_size, display_mode=display_mode) pl.create() # 创建PipeLine实例 # (Create PipeLine instance) # 初始化自定义人脸检测实例 # (Initialize the custom person detection instance) exce_demo(pl)
流程图
人体检测算法简述
常见的应用场景
人体检测是后续很多应用场景的基础,在下述场景中都可以用到人体检测算法
安防监控
- 人流量统计
- 异常行为检测
- 区域入侵检测
智能零售
- 客流分析
- 排队长度检测
- 购物行为分析
智能交通
- 行人检测
- 交通流量统计
- 闯红灯检测
智能家居
- 家庭安防
- 老人跌倒检测
- 婴儿监护
算法简述
网络结构
- 代码使用的是Anchor-based的检测网络
- 主干网络(Backbone)采用 CNN 架构
- 特征金字塔(FPN)结构,使用了3种尺度的特征图 (stride=8/16/32)
检测原理
特征提取
- 通过backbone提取多层级特征
- FPN结构融合不同尺度特征,增强小目标检测能力
- 生成3种尺度的特征图用于检测
Anchor 机制
- 预设不同尺寸的anchor boxes作为基础检测框
- 每个特征图cell对应多个anchor
- anchor boxes根据训练数据统计得到,提高检测效率
预测头 (Head)
- 分类分支:预测anchor是否包含人体及置信度
- 回归分支:预测anchor的位置偏移量(x,y,w,h)
- 每个特征点同时预测多个anchor
后处理流程
- 置信度过滤:使用confidence_threshold筛选高置信度目标
- NMS处理:通过nms_threshold去除重叠框
- 坐标变换:将预测框映射回原图尺寸