AI视觉处理代码结构
概论
本节我们来大致介绍一下K230后续AI相关例程的通用的前置知识以及代码结构
我们以最简单的人脸识别Face_detection为例
例程代码位于【源码汇总 / 07.Face / 01.face_detection】
注:下述代码是为了演示AIDemo的代码结构,并非全部来自人脸检测,因为人脸检测并不需要用到完整的代码结构。直接复制下面的代码并不能成功运行。完整的可执行的代码已放置在【源码汇总】目录中
导入模块
下面是FaceDection的导入列表
x# 从libs.PipeLine模块导入PipeLine和ScopedTiming类# (Import PipeLine and ScopedTiming classes from libs.PipeLine module)from libs.PipeLine import PipeLine, ScopedTiming# Pipeline 是集成了摄像头、LCD屏幕显示等多媒体功能的模块,大大简化了调用摄像头和显示相关的操作# (Pipeline is a module that integrates camera, LCD display and other multimedia functions, # greatly simplifying camera and display-related operations)# ScopedTiming是一个代码执行计时器,使用方法可以参考例程代码# (ScopedTiming is a code execution timer, refer to example code for usage)# 从libs.AIBase模块导入AIBase类# (Import AIBase class from libs.AIBase module)from libs.AIBase import AIBase# 从libs.AI2D模块导入Ai2d类# (Import Ai2d class from libs.AI2D module)from libs.AI2D import Ai2d# AIBase和AI2D 用来处理AI底层的逻辑# (AIBase and AI2D are used to handle underlying AI logic)# AIBase是所有AI功能实现类的基类,AI2D则用于处理图像# (AIBase is the base class for all AI function implementations, while AI2D is used for image processing)# 导入os模块,用于文件和目录操作# (Import os module for file and directory operations)import os# 导入ujson模块,用于JSON数据处理# (Import ujson module for JSON data processing)import ujson# os和ujson分别提供系统相关操作和JSON数据相关操作,不是每个例程都能用上# (os and ujson provide system-related operations and JSON data-related operations respectively, # they may not be used in every example)# 从media.media导入所有内容# (Import everything from media.media)from media.media import *# 从time模块导入所有内容# (Import everything from time module)from time import *# 导入nncase运行时库# (Import nncase runtime library)import nncase_runtime as nn# nncase是K230进行AI推理的核心模块,提供了便捷的方法供用户调用K230的KPU# (nncase is the core module for K230 AI inference, providing convenient methods # for users to call K230's KPU)# 导入ulab.numpy模块并别名为np# (Import ulab.numpy module and alias it as np)import ulab.numpy as np# ulab.numpy是从python的numpy中移植而来,用于进行一些AI运算中必要的矩阵操作# (ulab.numpy is ported from Python's numpy, used for necessary matrix operations in AI computations)# 导入time模块# (Import time module)import time# 导入utime模块# (Import utime module)import utime# 导入image模块# (Import image module)import image# 导入random模块# (Import random module)import random# 导入gc模块(垃圾回收)# (Import gc module (garbage collection))import gc# 导入sys模块# (Import sys module)import sys# 导入aidemo模块# (Import aidemo module)import aidemo# aidemo也是核心模块之一,K230固件中预制了非常多的AI玩法,# (aidemo is also one of the core modules, K230 firmware has many pre-built AI applications)# 通过aidemo模块可以快速简单的调用这些玩法中的复杂方法# (Through the aidemo module, you can quickly and easily call complex methods in these applications)# 导入 _thread 模块# (Import _thread module)import _thread# _thread 是线程模块,前面章节中我们有做过详细讲解,这里就不再赘述# (_thread is the threading module, we've explained it in detail in previous chapters, so we won't elaborate here)
自定义检测类
我们可以基于 AIBase 类自定义一个检测类,类中一般包含了如下几种方法:
init 初始化函数,用于配置AI任务的基本信息
xxxxxxxxxxdef __init__(self, kmodel_path, model_input_size, rgb888p_size=[224,224], display_size=[1920,1080], debug_mode=0):# 调用基类的构造函数# (Call the constructor of the parent class)super().__init__(kmodel_path, model_input_size, rgb888p_size, debug_mode)# 模型文件路径# (Path to the model file)self.kmodel_path = kmodel_path# 模型输入分辨率# (Input resolution for the model)self.model_input_size = model_input_size# sensor给到AI的图像分辨率,并对宽度进行16的对齐# (Image resolution from sensor to AI, with width aligned to 16 pixels)self.rgb888p_size = [ALIGN_UP(rgb888p_size[0], 16), rgb888p_size[1]]# 显示分辨率,并对宽度进行16的对齐# (Display resolution, with width aligned to 16 pixels)self.display_size = [ALIGN_UP(display_size[0], 16), display_size[1]]# 是否开启调试模式# (Whether to enable debug mode)self.debug_mode = debug_mode# 实例化Ai2d,用于实现模型预处理# (Instantiate Ai2d for model preprocessing)self.ai2d = Ai2d(debug_mode)# 设置Ai2d的输入输出格式和类型# (Set the input/output format and data type for Ai2d)self.ai2d.set_ai2d_dtype(nn.ai2d_format.NCHW_FMT, nn.ai2d_format.NCHW_FMT, np.uint8, np.uint8)config_preprocess 配置图像处理信息和一些预处理操作
xxxxxxxxxxdef config_preprocess(self, input_image_size=None):with ScopedTiming("set preprocess config", self.debug_mode > 0):# 初始化ai2d预处理配置,默认为sensor给到AI的尺寸,可以通过设置input_image_size自行修改输入尺寸# (Initialize ai2d preprocessing configuration, default is the size provided by the sensor to AI,# you can modify the input size by setting input_image_size)ai2d_input_size = input_image_size if input_image_size else self.rgb888p_size# 配置resize预处理方法# (Configure resize preprocessing method)# 这里使用了resize,Ai2d支持crop/shift/pad/resize/affine,具体代码请打开/sdcard/libs/AI2D.py查看# (Resize is used here, Ai2d supports crop/shift/pad/resize/affine,# check /sdcard/libs/AI2D.py for specific code)self.ai2d.resize(nn.interp_method.tf_bilinear, nn.interp_mode.half_pixel)# 构建预处理流程# (Build the preprocessing pipeline)# 参数分别为输入尺寸[batch,channel,height,width]和输出尺寸[batch,channel,height,width]# (Parameters are input size [batch,channel,height,width] and output size [batch,channel,height,width])self.ai2d.build([1,3,ai2d_input_size[1],ai2d_input_size[0]],[1,3,self.model_input_size[1],self.model_input_size[0]])PreProcess 图像的前处理
xxxxxxxxxxdef preprocess(self, input_np):# 假设该任务需要crop和resize预处理,顺序是先resize再crop,该顺序不符合ai2d的处理顺序,因此需要设置两个Ai2d实例分别处理# (Assuming this task requires crop and resize preprocessing, in the order of resize first then crop,# which doesn't match ai2d's processing order, so two Ai2d instances are needed for separate processing)# 使用第一个ai2d实例执行resize操作# (Use the first ai2d instance to perform resize operation)resize_tensor = self.ai2d_resize.run(input_np)# 将resize后的tensor转换为numpy数组,以便进行下一步处理# (Convert the resized tensor to numpy array for the next processing step)resize_np = resize_tensor.to_numpy()# 使用第二个ai2d实例执行crop操作# (Use the second ai2d instance to perform crop operation)crop_tensor = self.ai2d_crop.run(resize_np)# 返回预处理后的tensor列表,便于后续推理使用# (Return the preprocessed tensor list for subsequent inference)return [crop_tensor]run 进行AI推理的核心步骤。对于无预处理的AI任务,需要在子类中重写该函数
xxxxxxxxxxdef run(self, inputs_np):# 因为没有预处理过程,所以原来run操作(AIBase)中包含的preprocess->inference->postprocess不合适,这里只包含inference->postprocess# (Since there is no preprocessing process, the original run operation (AIBase) that includes# preprocess->inference->postprocess is not suitable, here it only includes inference->postprocess)# 先将ulab.numpy.ndarray列表转换成tensor列表# (First convert the ulab.numpy.ndarray list to a tensor list)tensors = []for input_np in inputs_np:# 将每个numpy数组转换为神经网络可接受的tensor格式# (Convert each numpy array to tensor format acceptable by the neural network)tensors.append(nn.from_numpy(input_np))# 调用AIBase内的inference函数进行模型推理# (Call the inference function within AIBase to perform model inference)results = self.inference(tensors)# 调用当前子类的postprocess方法进行自定义后处理# (Call the postprocess method of the current subclass for custom post-processing)outputs = self.postprocess(results)# 返回最终处理结果# (Return the final processing results)return outputsPostProcess 对AI识别的结果做后处理
xxxxxxxxxxdef postprocess(self, results):# 自定义当前任务的后处理,results是模型输出array列表,这里使用了aidemo库的face_det_post_process接口# (Customize the post-processing for the current task, results is a list of model output arrays,# here the face_det_post_process interface from the aidemo library is used)# 使用ScopedTiming上下文管理器跟踪后处理阶段的执行时间(如果debug_mode大于0则启用)# (Use ScopedTiming context manager to track execution time of the post-processing phase if debug_mode > 0)with ScopedTiming("postprocess", self.debug_mode > 0):# 调用aidemo库的人脸检测后处理函数处理模型输出# (Call the face detection post-processing function from aidemo library to process model outputs)post_ret = aidemo.face_det_post_process(self.confidence_threshold, # 置信度阈值,用于过滤低置信度的检测结果# (Confidence threshold to filter out low-confidence detection results)self.nms_threshold, # 非极大值抑制阈值,用于合并重叠的边界框# (Non-maximum suppression threshold for merging overlapping bounding boxes)self.model_input_size[1], # 模型输入宽度,用于坐标转换# (Model input width, used for coordinate conversion)self.anchors, # 锚框配置,用于解码模型输出# (Anchor box configuration for decoding model outputs)self.rgb888p_size, # 原始图像尺寸,用于将检测结果映射回原始图像坐标系# (Original image size for mapping detection results back to original image coordinates)results # 模型推理输出的结果# (Results output from model inference))# 如果没有检测到人脸,直接返回空列表# (If no faces detected, return empty list directly)if len(post_ret) == 0:return post_ret# 否则返回第一个检测结果(假设这是单张图片的处理)# (Otherwise return the first detection result, assuming this is processing for a single image)else:return post_ret[0]DrawResult 将结果绘制到画面上
xxxxxxxxxxdef draw_result(self, pl, dets):# 自定义绘制检测结果的方法,pl 是用于显示的对象,dets 是检测到的对象列表# (Custom method to draw detection results, pl is the display object, dets is the list of detected objects)# 使用ScopedTiming上下文管理器跟踪绘制阶段的执行时间(如果debug_mode大于0则启用)# (Use ScopedTiming context manager to track execution time of the drawing phase if debug_mode > 0)with ScopedTiming("display_draw", self.debug_mode > 0):# 检查是否有检测结果# (Check if there are detection results)if dets:pl.osd_img.clear() # 清除OSD图像# (Clear the OSD image)for det in dets:# 将检测框的坐标转换为显示分辨率下的坐标# (Convert the bounding box coordinates to the display resolution coordinates)x, y, w, h = map(lambda x: int(round(x, 0)), det[:4]) # 提取并四舍五入坐标# (Extract and round the coordinates)# 根据显示尺寸调整坐标# (Adjust coordinates according to display size)x = x * self.display_size[0] // self.rgb888p_size[0]y = y * self.display_size[1] // self.rgb888p_size[1]w = w * self.display_size[0] // self.rgb888p_size[0]h = h * self.display_size[1] // self.rgb888p_size[1]pl.osd_img.draw_rectangle(x, y, w, h, color=(255, 255, 0, 255), thickness=2)else:# 如果没有检测结果,清除OSD图像# (If there are no detection results, clear the OSD image)pl.osd_img.clear()
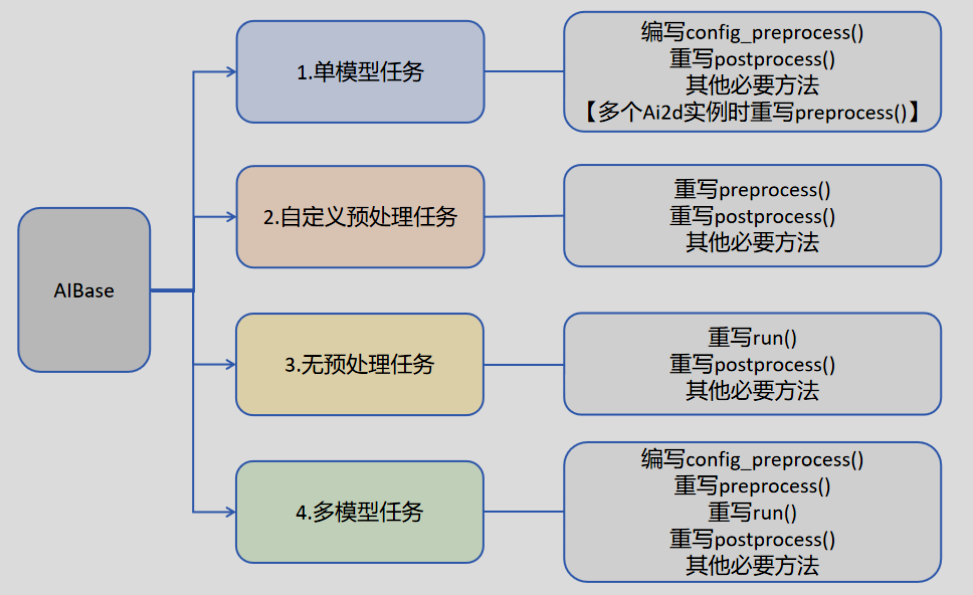
并非所有AIBase的方法都需要重写。我们可以将任务分为如下四类:单模型任务、多模型任务,自定义预处理任务、无预处理任务。不同任务需要编写不同的代码实现,具体如下图所示:
执行当前例程
我们定义了exce_demo(pl)方法来执行当前的AI例程
传入的参数pl是一个Pipeline实例
这样设计是为了可以让这个AI例程被外部调用。Pipeline管理了K230全局的摄像头和显示输出,所以在一次程序运行中,只能存在一个Pipeline实例
这部分的代码流程基本上是一致的,我们还是以人脸检测的例程为例
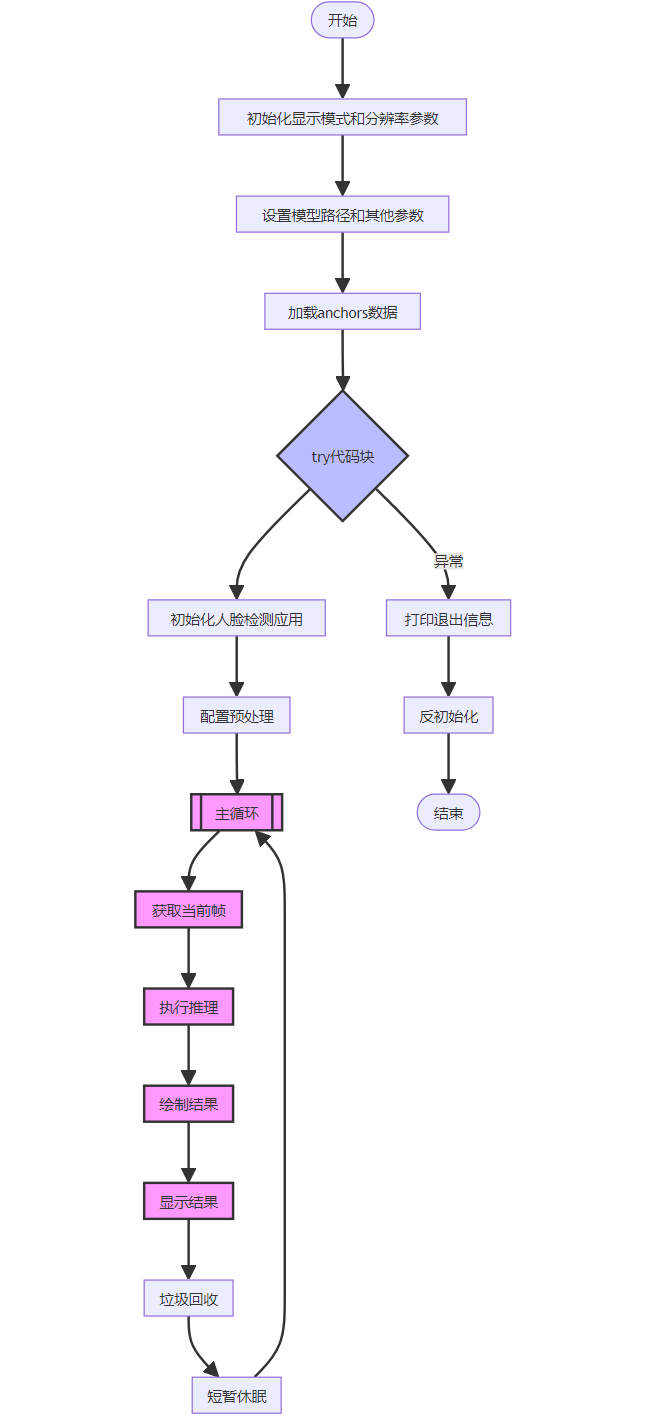
xxxxxxxxxxdef exce_demo(pl): # 全局变量face_det,用于记录人脸检测应用程序实例 global face_det # 获取当前显示模式、分辨率和显示尺寸 # (Get the current display mode, resolution and display size) display_mode = pl.display_mode rgb888p_size = pl.rgb888p_size display_size = pl.display_size # 设置模型路径和其他参数 # (Set the model path and other parameters) kmodel_path = "/sdcard/kmodel/face_detection_320.kmodel" confidence_threshold = 0.5 nms_threshold = 0.2 anchor_len = 4200 det_dim = 4 anchors_path = "/sdcard/utils/prior_data_320.bin" anchors = np.fromfile(anchors_path, dtype=np.float) anchors = anchors.reshape((anchor_len, det_dim)) try: # 创建人脸检测应用程序实例 # (Create a FaceDetectionApp instance) face_det = FaceDetectionApp( kmodel_path, model_input_size=[320, 320], anchors=anchors, confidence_threshold=confidence_threshold, nms_threshold=nms_threshold, rgb888p_size=rgb888p_size, display_size=display_size, debug_mode=0 ) face_det.config_preprocess() # 配置预处理 # (Configure the pre-processing) # 进入主循环 # (Enter the main loop) while True: with ScopedTiming("total", 0): # 获取当前帧数据 # (Get the current frame data) img = pl.get_frame() # 在当前帧上运行人脸检测 # (Run face detection on the current frame) res = face_det.run(img) # 绘制检测结果 # (Draw the detection results) face_det.draw_result(pl, res) # 显示结果图像 # (Show the result image) pl.show_image() # 进行垃圾回收 # (Perform garbage collection) gc.collect() # 短暂休眠一段时间 # (Sleep for a short duration) # 注:这是为了在其它程序中以多线程的形式调用人脸检测时,避免人脸检测的线程把CPU跑满 # Micropython 的线程机制是非抢占式的,需要执行中的线程主动调用time.sleep,否则将会一直占用处理器 time.sleep_us(10) except Exception as e: # 捕获异常并打印退出消息 # (Catch exceptions and print the exit message) print("人脸检测功能退出") finally: # 反初始化人脸检测应用程序 # (De-initialize the FaceDetectionApp) face_det.deinit()执行流程图如下:
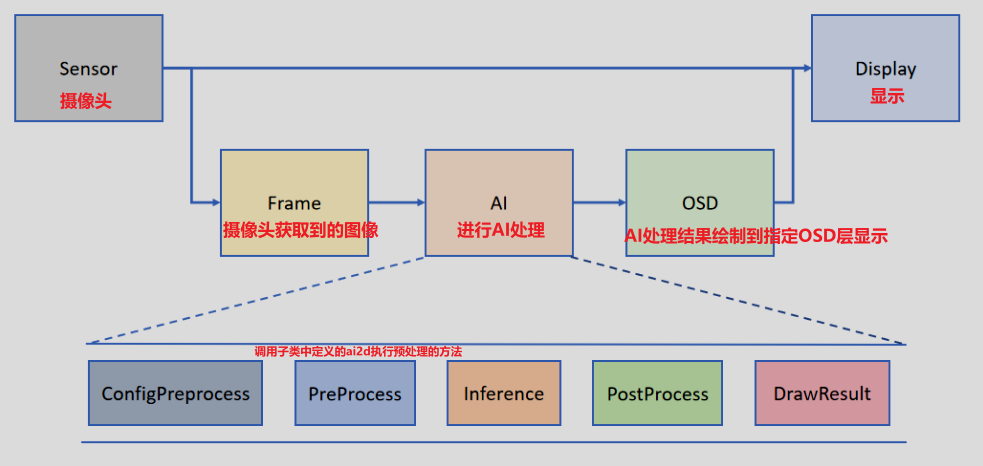
在Pipeline的定义中,Camera 默认输出两路图像:一路格式为 YUV420SP (Sensor.YUV420SP),直接提供给 Display 显示;另一路格式为 RGBP888 (Sensor.RGBP888),则用于 AI 部分进行处理。AI 主要负责任务的前处理、推理和后处理流程。处理完成后,结果将绘制在 OSD 图像实例上,并发送给 Display 进行叠加显示。
结束当前例程
结束例程部分非常简单,只需要释放掉我们创建的实例即可。以人脸识别为例
xxxxxxxxxxdef exit_demo(): global face_det face_det.deinit()
主进程
当我们想要在其他程序中调用例程时,我们需要导入该例程后,创建该例程的对象并且调用exce_demo()方法,并传入Pipeline实例
而如果我们是想直接在K230中运行这个例程,我们就需要在主函数中创建Pipeline实例
代码如下所示
xxxxxxxxxxif __name__ == "__main__": rgb888p_size=[640,360] display_size=[640,480] display_mode="lcd" # 初始化PipeLine,用于图像处理流程 # init pipeline pl = PipeLine(rgb888p_size=rgb888p_size, display_size=display_size, display_mode=display_mode) pl.create() # 创建PipeLine实例 create pipeline object # 初始化自定义人脸检测实例 # run process exce_demo(pl)